Signal-To-Noise (SNR calculation)
IMPORTANT: currently only 3D images are supported.
To judge the quality of smFISH image, calculation of the SNR can be useful. This compares the signal (above background) to local background flucutations.
Plugin is available here.
Here, we provide an ImJoy plugin that calculates the SNR for each detected
spot in 2D or 3D images. In short, the plugin extracts a small 2D area or 3D volume around the detected spot.
From this area/volume the signal intensity (I) is determined as the maximum pixel intensity. The background ('B') is
calculated as the mean intensity from the outer most layer, the noise (N) as the standard deviation of these layer. The signal-to-noise ratio (SNR)
is then calculated as SNR = (I-B)/N for each spot.
Usage
You first have to detect spots in your images. Then you can use the SNR plugin:
-
Before running the plugin, you have to specify a few parameters. This can be done in the plugin interface, avaible after clicking on the arrow down next to the plugin name.
Here the following parameters can be set:
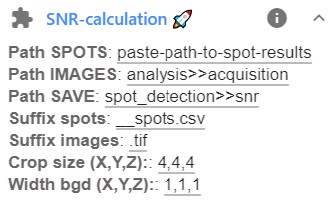
Option Type Description Path SPOTSstr Full path to folder containing data to be segmented. Path IMAGESstr Path to images. Several options exist. See dedicated section below for more details. Path SAVEstr Path to images. Several options exist. See dedicated section below for more details. Suffix spotsstr Last part of the file-names of the spot detection results ( __spots.csv). This part has to be replaced with suffix_images to obtained the name of the images.Suffix imagesstr Last part of file-name of the images. See suffix spots. String img extstr File extension of images that should be segmented. Crop sizeint Size of the region cropped around each spots (ZYX). Values are separated by ,.Width bgdstr Width of the background region, e.g. thickness of outer layer that is used as background. -
Pressing on the plugin name
SNR-calculationwill start the SNR calculation. - Results will be stored in the specified folder, by default this folder will be called
snr. Here a file for each processed spot-detection result is saved. For each spots, the SNR, signal, background and noise are stored. Lastly, a summary file with all these values is provided.
Specify folder to save results
Several possibilities are provided to specify the folder to save the results of the different workflows. Here, the general options are described, if a plugin deviates from this default behavior it will be described in the respective plugin.
When asked to define a folder to save results, you can:
- Directly define a full path where the results should be stored. If the folder doesn't exist, it will be created.
-
Define a folder with a text replacement. This option can be useful if many folders are processed, e.g. when a recursive search is performed.
- Such a replacement operation is indicated with a string in the format
str_orig>>str_new, where 'str_orig' is the orginal string,str_newis the new string. - For instance, using the string
analysis>>acquisitionimplies that in the folder nameD:\example_data\acquisition,acquisitionwill be replaced withanalysis, yieldingD:\example_data\analysis.
- Such a replacement operation is indicated with a string in the format